Saturday, December 31, 2011

Happy Birthday Mom!

Not only is today New Year's Eve
but it's also my mom's birthday,
giving her double the reason to party!

Here's to another great year to my wonderful mother - 
the twice-daily swim practice driver,
the "get out of bed NOW" waker-upper,
the yummy apple pie baker,
the Michigan fight song singer,
the family scrapbook maker,
and
the glue that keeps our family together.

Happy Birthday Mom!

Just a regular day - lounging and drinking wine in the shade 
My USC graduation
Wine tasting in Santa Ynez 
Masquerading at Rideau Vineyards
Watching Carrie Underwood at the Hollywood Bowl
My bridal shower
Rehearsal dinner

Love you!

Wednesday, December 21, 2011

Chocolate Peppermint Thumbprint Cookies


The other day I told you I made two kinds of chocolate peppermint cookies at our baking party.
The first was the Chocolate Peppermint Crunch cookies.
The second were these Chocolate Peppermint Thumbprint cookies from Martha Stewart.
I saw her make them on the Today show last week and immediately looked up the recipe.

They remind me a lot of my favorite peanut butter blossom cookies,
you know, the ones with the Hershey Kiss in the middle.
But these are kind of better, in a way.
Instead of a hard Kiss in the middle, these have a soft chocolate peppermint filling,
making them much easier to gobble up in one bit, if you're so inclined.

The baking method is very similar to the Peppermint Crunch cookies,
with the rolling into balls, dipping in sugar, and divided baking time.
And obviously the tastes are pretty close too - Chocolate Peppermint.
But these look a bit more elegant with the sparkly sugar coating.
You really can't go wrong with either cookie
so maybe you should make both like I did!


Chocolate Peppermint Thumbprint Cookies
from Martha Stewart and the Today Show

2 cups all purpose flour
2/3 cup unsweetened cocoa powder
1/4 teaspoon salt
1 1/4 cups unsalted butter, room temp
1 1/2 cups granulated sugar
1 large egg
1 Tablespoon pure vanilla extract
3/4 cup semisweet chocolate chips
1/2 teaspoon pure peppermint extract

1.  Place racks in upper and lower thirds of the oven and preheat to 350.

2.  Whisk together flour, cocoa powder, and salt in a medium bowl.

3.  In a large bowl, use an electric mixer to mix 1 cup each of butter and sugar on medium-high until light and fluffy, about 3 minutes.  Add egg and vanilla; beat to combine.  With mixer on low, gradually  add flour mixture and mix until combined.

4.  Put 1/2 cup sugar in a small bowl.  Roll dough into 1 inch balls, then roll in the sugar to coat.  Place balls 1 inch apart on 2 baking sheets lined with parchment or a Silpat.

5.  Bake for 5 minutes.  Remove from oven.  Use the back of a round teaspoon to make an indentation in the center of each cookie.  Return to oven, rotating the position of the sheets, and bake about 4 more minutes.  Let cool on sheets on wire racks.

6.  In a small bowl, microwave the chocolate and 1/4 cup butter in 10-second increments until melted, stirring between each increment.  Stir in the peppermint extract.  Cool a few minutes, then put into a small ziploc baggie.  Snip off one corner and pipe chocolate into cookie indentations.   Cookies will store well in an airtight container for 1 week.


Enjoy!

Monday, December 19, 2011

Chocolate Peppermint Crunch Cookies


A few of my girlfriends and I have started a new tradition of getting together for a day of baking. 
It started during the holidays last year and we have since done it 2-3 other times,
rotating whose house we go to and trying new recipes each time.

We mostly make cookies, but we've also whipped up some cakes and biscotti.
It's a great way to spend some girl time together.  
And as a bonus, we get to go home with Tupperware filled with goodies.
What more could you ask for?


This year I made two different types of chocolate peppermint cookies.
I saw this recipe on Two Peas & Their Pod and knew I had to give it a try.
The cookies look so fun and festive, and perhaps more importantly, easy to make.


They came out really well, and taste delicious.
It makes me wonder what other candy I can put on chocolate cookies...
Butterfingers?  Heath Bars?  Gummy bears?
Yeah, probably not that last one, huh?

Chocolate Peppermint Crunch Cookies
From Two Peas & Their Pod

2 cups sifted all purpose flour
2 teaspoons baking powder
1/2 teaspoon salt
1/4 cup canola oil
4 oz unsweetened chocolate, melted
2 cups sugar
4 large eggs
2 teaspoons vanilla
crushed candy canes

1.  Whisk together flour, baking powder, and salt.  Set aside.

2.  In a stand mixer, or with a hand mixer, combine oil, chocolate, and sugar  on medium speed.
Add in eggs one at a time.  Then add vanilla, scraping the sides of the bowl as needed.
Add in the dry ingredients on low speed and mix until just blended.

3.  Gather the dough in a disk and wrap in plastic wrap.
Refrigerate for at least 2 hours, or overnight.

4.  Position racks in the upper and lower thirds of the oven.  Preheat to 350.
Line 2 baking sheets with a Silpat or parchment paper.

5.  Pour crushed candy canes in a small bowl.
Tip: Pulse them in a food processor to crush
Roll dough into 1 inch balls, then roll in the candy canes.  
Put them 2 inches apart on baking sheets.

6.  Bake for 5 minutes, then rotates pans.  
Bake for 5 minutes longer.
Let cool before trying to take them off the sheets, otherwise they'll smush up.


Enjoy!

Friday, December 16, 2011

It's Friday! And I'm Filling in Some Blanks!


Happy Friday everyone! 
Only one more week to go until Christmas!
Have you got your shopping done?
Mine is mostly done, though the hubby hasn't even started.  Typical.

This weekend I'm getting together with friends to bake some cookies.
I'm thinking of making these chocolate thumbprints.
Or maybe even getting a little ambitious and making this rolled chocolate peppermint cake.
Do you have any other cookie recommendations?


I'm also linking up with Lauren's Fill In The Blanks today.
Head on over and link up too!


1.   My most favorite "little thing" is    coming home from work to put on warm flannel pj's and fuzzy socks.  Then cuddling on the couch with Cheeto while waiting for Tor to get home. 

2.   I give anything to   enjoy a really long hot bath these days.  Unfortunately it's not allowed, as it might literally cook the baby.

3.  I can't believe    that Christmas is right around the corner.  And that I'm almost half way through the pregnancy.  It still doesn't feel quite real!

4. The one thing I'd like to achieve today is    baking something.  Making some phone calls.  Finding a gift for my secret santa at work.  Okay that's three things, but very achievable .

5.  The last thing I want to do today is    go to the mall.

6.  If I were writing my own blank today, it would say:  uh, yeah....there's a reason I don't write blanks!

7.  My favorite candle scent is    the pine tree candle I picked up the other day.  Our tree doesn't make our house smell pine-y enough so I had to supplement with a candle!


Have a great weekend!

Thursday, December 15, 2011

Pregnancy Symptoms Your Friends Don't Talk About


During the past 16 weeks of my pregnancy, I feel like I've had just about every symptom and side effect listed on the pregnancy sites.  Fatigue, dizziness, sore breasts, fluctuating emotions, and of course nausea.   I've been nauseous almost every day of the past 4 months.  I haven't actually gotten sick (aka vomited), but at times I think I might actually feel better if I did.  

I was eager to hit week 14, the week I heard my nausea would probably go away.  Two weeks later and I still feel icky.  Unfortunately I have yet to feel that "Second Trimester Glow" that I was so looking forward to.  

Maybe the old wives tale about baby girls and morning sickness are true?

Along with the symptoms above, I've had a bunch of others that kinda surprised me.  I think these are the things your girlfriends probably don't talk about, and maybe for good reason.

1.  Gas.  Lots and lots of gas.  Caused by higher levels of progesterone, which slows down the digestive process.   I used to scold my husband whenever he burped after dinner, but now I'm the one belching up a storm.  Not really the best way to keep the romance alive!

2.  Excessive mouth watering.  Along with the constant nausea I had (and still have), my mouth was constantly watering.  Which just made me more nauseous.  It's like an evil circle.

3.  Constipation.  No explanation needed.  Again caused by the slowed digestive process.  Also most likely made worse by the iron included in most prenatal vitamins.

4.  Heartburn.  I know this gets more common as the baby gets bigger and squishes your tummy and everything else.  But I've had it pretty bad from day 1.  There are the obvious culprits (acidic foods, carbonated drinks, chocolate).  But I get it from everything.  Even water.  Lucky me.

5.  Crazy vivid dreams.  Monsters chasing me.  Talking babies with adult sized heads.  By far the weirdest dreams I've ever had, on an almost nightly basis.

Some of these have gotten better or disappeared over the past several weeks (mouth watering) but the heartburn is still pretty constant.  I've learned to eat really small meals throughout the day, which is not easy.  I have to stop myself early, before I feel full, or else I know I'll feel sick later.  I can't wait for the day that I can just eat a meal without worrying about if it'll make me sick later!

It's not all sickness and worry, though.  Other parts of the pregnancy have been easy so far.  I've only gained a pound or two, although I can't button up most of my pants anymore.  (Thank goodness for belly bands and my sister's old clothes from before she lost some weight.)  I haven't had much back pain or anything.  And, for the most part, I'm not too fatigued.  Which probably means I should get off my butt more often and exercise!  I am taking a Pilates class tonight, so that's a good start, right?!


Monday, December 12, 2011

Chocolate Peanut Butter Bars


If you're looking for an easy homemade treat
to bring to a holiday (or any other) party,
then you definitely must try these bars.
They have become my staple treat to bring
and they never fail to disappear by the end of the night.
I mean, who doesn't like chocolate and peanut butter together?

There are no fancy steps in this recipe,
it only requires a bit of time to allow the chocolate to harden.

The original recipe is from Mrs. Fields Cookie Book,
one of my first cook books,
which is filled with great cookie recipes (go figure!).
I altered a few of the measurements
to get a crisper crust
and a greater chocolate to peanut butter ratio.

Seriously, you MUST try these bars. 

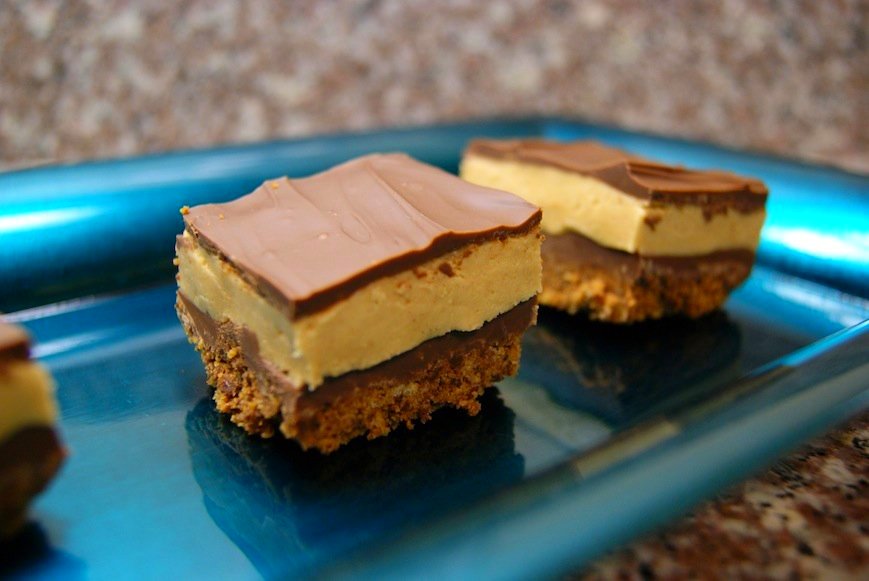
Creamy Peanut Butter Chocolate Bars

8 medium chocolate chip or butter cookies
3 Tablespoons salted butter, melted
2 1/2 cups (15 oz) milk chocolate chips
3/4 cup creamy peanut butter
1/4 cup salted butter, softened
1 1/2 cups confectioners' sugar
1 teaspoon vanilla extract

1.  Preheat oven to 350

2.  Process the cookies in a food processor until finely ground.


Add the melted butter and mix completely.
Press into bottom of 8x8 baking pan and bake for 10 minutes.
Cool to room temperature.


3.  Melt a little bit more than half the chocolate in a double boiler or microwave.
(I like a little thinner chocolate layer on the top)
Pour over the crust and smooth evenly.
Put in the fridge to harden.

4.  Mix the peanut butter and softened butter together until smooth.
Slowly add in the confectioners' sugar, then the vanilla.
Beat until smooth.
Spread the filling over the chilled chocolate layer.
Melt the remaining chocolate and spread evenly over the peanut butter layer.


Chill in the fridge about 1 hour until hardened.
Then, take it out of the fridge for another 30 minutes or so before slicing.
(The chocolate tends to crack if you try to slice straight out of the fridge)

The edges of my pan are sloped
so to get nice flat pieces that sit nicely on a plate
I slice off about a 1/2 inch strip all the way around the pan before cutting into bars.
Plus, this gives you little pieces to nibble on without eating a whole bar!


 I slice the pieces fairly small, because these are super rich.


Oh so Yummy!

Enjoy!

Wednesday, December 7, 2011

Easy Asian Beef and Noodles


This recipe is true to its name…..easy.
While it may not be the most authentic asian dish,
you can have it cooked and on the table in under 30 minutes.
Which is great on a Wednesday night 
and you’re struggling to just make it to the weekend.

I’ve had this recipe in my box for a few years now.
 I’m not sure where I got it 
but a Google search points to Cooking Light.
Kinda ironic, I think, considering how unhealthy Top Ramen is.
Was anyone else shocked to find that out 
after years of eating it in college, 
thinking you were being healthy and economical?


Easy Asian Beef and Noodles (2 servings)
Cooking Light

8 oz ribeye steak
1 teaspoon dark sesame oil
1 cup sliced green onions
2 cups prepared cole slaw mix
2 packages of beef flavored ramen noodles
1 ½ cups water
1 Tablespoon soy sauce

Trim fat from steak and cut diagonally across the grain into thin strips
Heat ½ teaspoons oil in skillet over med-high heat.
Add steak and onions.  Stir fry 1 minute, or until cooked through.
Heat ½ teaspoon oil. Add slaw mix and stir fry 30 seconds.
Remove from pan and keep warm.
Remove noodles from packages.
Add water and 1 flavor package to the skillet.  Heat to boiling.
Break noodles in half and cook until most of the liquid is absorbed.
Add the beef and slaw to the pan.  Cook till heated through.

(489 calories, 68.1g carbs, 12.5g fat, 29g protein, 4.9g fiber)


Enjoy!


Tuesday, December 6, 2011

Sugar and Spice....


I've been keeping a little secret from you.
Well, most of you.
And now that it's officially on Facebook
I figured it's time to share on blog-land, too!

We are expecting our first baby in May!
And we found out today that it's a girl!
Or, as the doctor put it, she's 99% sure that we're having a girl.

So this kinda explains the lack of posting lately,
and especially the lack of recipe posts.
It's hard to write about food 
when you're just trying to make it through the day 
without it coming back up.

I've been feeling pretty nauseous, 
amongst other wonderful side effects of pregnancy.
But we'll get into that in another post.
Betcha can't wait for that one, huh?!

So do you want to see a few pics of the little one?

Here she is at just 7 weeks...
And waving hello at 11 weeks...


Amazing that in just 4 short weeks
she goes from looking like a bean
to looking like a real human.

I'm about 15 weeks along now
and crossing my fingers I get my appetite back soon.
I mean really, what's the holiday season
without being able to enjoy cookies and peppermint bark?

Friday, December 2, 2011

Tis the Season....For Cookies!

A few of my girlfriends and I started a tradition last year
in which we get together and bake a whole bunch of cookies.
We then divvy them up so we each go home
with a huge batch of assorted baked goods.
It's a fun way to spend an afternoon with friends
and try out some new recipes.

To get ready for our baking session this year
I scoured several magazines, tearing out anything that sounded good,
and like something I could actually accomplish.

Wanna see my stash?


Now I just have to decide on which ones to actually bake!

Do you have any favorite holiday baking recipes?

Thursday, December 1, 2011

Going Dark


Last night I was all ready to write up a new recipe to be posted for you this morning.
And then the power went out.  All night.
Which means no internet.
Which means no blogging.
Because I’m not getting up any earlier than I have to (5:30am) to write a post.
(I actually wrote this little blurb last night….I’m sneaky like that)
Sorry.  I like you guys and all, I just like sleeping more.

So you’re left with a dark picture of the really tasty white chili
that we ate by candle and lantern light.
Recipe (and hopefully a picture) to come soon.


Oh, and it turns out this is my 100th post.
Woo hoo!